Improve Web Site Performance using Azure Cloud StorageThe web page load time is one of the most important web site performance metrics allowing one to evaluate the overall performance of a web site. The web page load time depends on a number of different factors including the performance of the web site host server, the current server and network load, the size of each specific web page and the physical location of each visitor. There are a large number of ways to reduce the web page load time including clustered web servers, compression of static images and various content delivery networks. One additional option is to offload static images to the Microsoft Azure cloud storage. The purpose of this review is to compare the web page load time of three identical web pages containing 24 JPEG images with the total size of 1.2 MB. The first web page served the content and all images from the web site host server physically located in Salt Lake City, Utah, USA. The second web page served all static images from a Microsoft Azure cloud storage account physically located on the East US coast. Finally, the third web page served all static images from another Microsoft Azure cloud storage account physically located on the East US coast. The web page load time of all three identical web pages was measured during 14 days from five different physical locations including:
During the 14 days of measurements, the web page which served images from the web site host averaged to 1.32 seconds, the web page which served images from the first Azure storage account averaged to 1.04 seconds and the web page which served images from the second Azure storage account averaged to 1.08 seconds. 
According to the average web page load times, both pages which served images from the Microsoft Azure cloud storage improved the web page load time by approximately 20 percent when compared to the same web page which served static images from the web site host server. 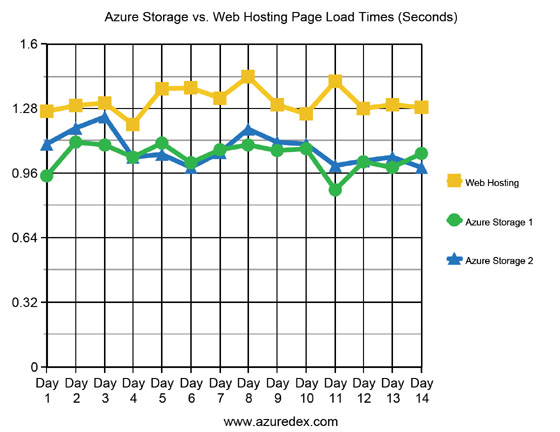
The Microsoft Azure cloud storage provides a number of different types of storage accounts allowing one to select an appropriate data protection model according to the user-specific needs. Also, the user is provided with the ability to select a data center physically located in the area from which the majority of the web site visitors are coming. 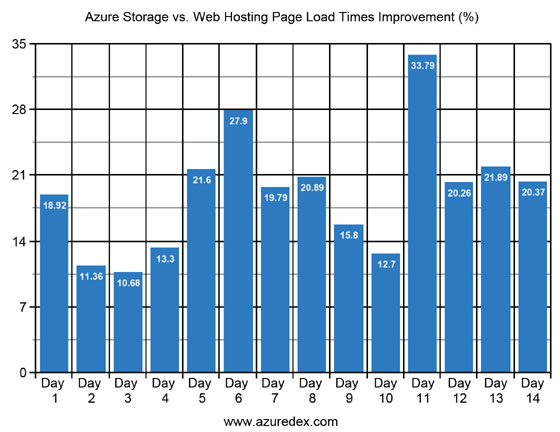
In order to store images in the Microsoft Azure cloud storage and then allow access to the images from a web page, the user needs to perform the following procedure:
In order to create an Azure storage account, open the web browser and navigate to: On the Microsoft Azure portal page, press the 'New' button, select the 'Data + Storage' category and then select the 'Storage Account' item. On the storage account configuration page, select an appropriate data protection model, select a geographical location for the storage account, enter a storage account name and press the 'Create' button. Once the Azure storage account will be created, open the storage account properties page, select the 'Keys' section and copy the primary account access key to the clipboard. Now, in order to be able to manage storage containers and upload images to the storage account, download and install the Azure Data Expert free software utility, which allows one to upload, manage and analyze data stored in one or more Microsoft Azure cloud storage accounts. 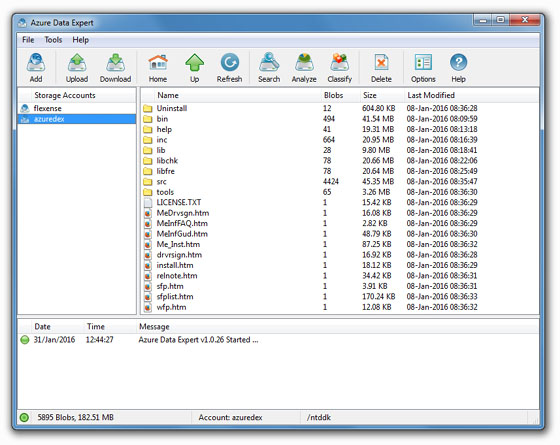
In order to add the storage account to the Azure Data Expert configuration, press the 'Add' button located on the main toolbar, specify the storage account name and copy the primary access key from the clipboard. Once finished entering the required information, press the 'Verify' button to check the storage account and the specified access key. 
Now, double click on the storage account name to connect to the Microsoft Azure cloud storage account. Initially, there are no storage containers and in order to be able to upload images the user needs to create a storage container and configure public access permissions. Press the right mouse button over the main storage view and select the 'Create Container' menu item. 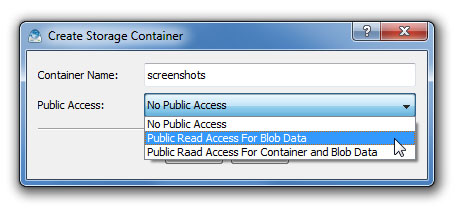
On the storage container dialog, enter a storage container name and then select appropriate public permissions for the container. A storage container name can be between 3 and 63 characters long and it can contain only lower case characters and numbers. By default, storage containers are created without public access and in order to be able to serve the images over the Internet, the user needs to enable public access to data blobs stored in the storage container. 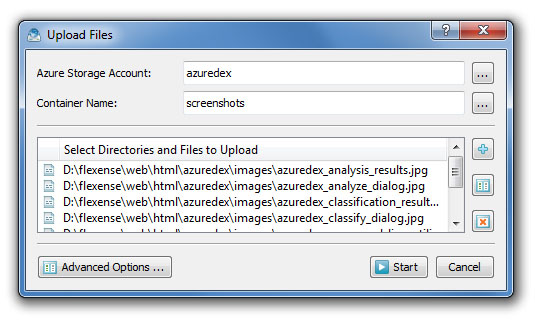
Now, in order to upload images to the created storage container, press the 'Upload' button located on the main toolbar. On the 'Upload Files' dialog, select the storage container to upload images to and then press the 'Add' button and select files or entire directories to be uploaded to the storage container. After finished selecting files to be uploaded, press the 'Start' button and wait for the upload operation to complete. 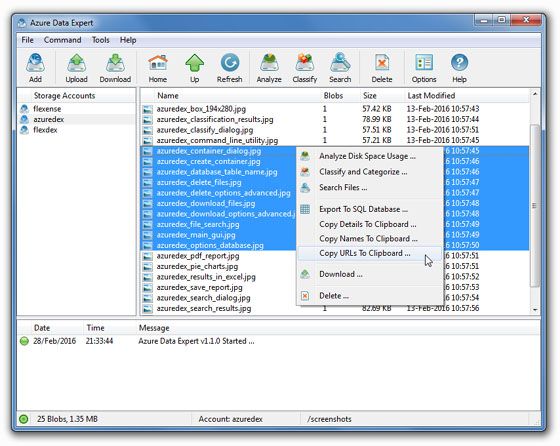
Once the upload operation is completed, double click on the storage container name to show the list of data blobs stored in the storage container. Now, select one or more images in the storage view, press the right mouse button and select the 'Copy URLs To Clipboard' menu item. Azure Data Expert will copy public URLs of the selected images to the clipboard allowing one to paste these URLs to a web page which should serve the images from the Microsoft Azure cloud storage account. |
   |